Posted 11 years ago
·
Author
In this tutorial, I will teach you how to make a simple furniture node for your mesh. A furniture node will act the same way as a node in a room does, allowing you to drag any product onto it and have it snap to your mesh. Which can then be locked to your mesh.
Step 1) Make a basic cube. The cube can be any size but it is ideal to have it smaller than the area you're placing it on. For example, if your node is going to be placed on top of a shelf, make the cube smaller than the shelf.
Step 2) Select all the edges and faces of the cube. You can do this by simply drawing a selection around it or double clicking on one of the faces.
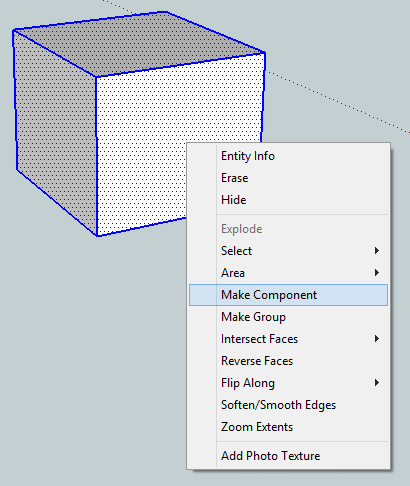
Step 3) Make sure all of the faces and edges of the cube are selected, then right click on it and choose "make component".

Step 4) In the name field, type "furniture.Floor.01". Make sure you capitalize Floor and include the periods. If you are making more than 1 node, you would name them like so: "furniture.Floor.01", "furniture.Floor.02", "furniture.Floor.03" and so on and so fourth.
Step 5) Click Create and move this newly created node to wherever you want the node on your mesh to be.
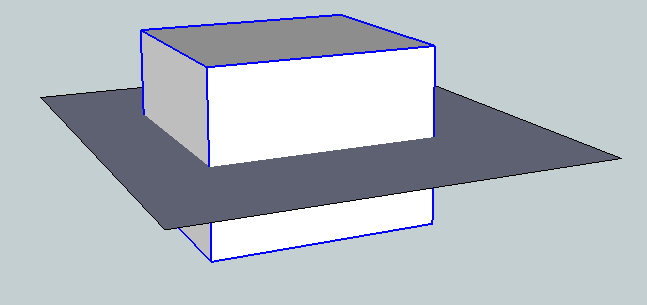
Step 6) Move the node halfway inside your mesh like this:

Note: If you're using the new version of Meshout, you can skip this step. In the new version, the bottom of the cube is the bottom of the node.
You do this because the middle of the cube is actually the bottom of the node, if you don't do this, your item will hover above your mesh when you drag it onto the node.
That's it, you're done. If you want to make more nodes to add to your mesh then simply repeat this process as many time as you like, but make sure to name the new nodes accordingly.
TIP: To save time, you can copy your existing node and paste it somewhere else to make a new node. Then just right click on the new node and choose "Entity Info" and edit the name. However, make sure you right click on the new node and choose "make unique" otherwise when you re-name it, it will rename your other node(s) too. This will allow you to easy and quickly make new nodes to add to your mesh.
TIP 2: You can rotate the node any way you like to make products snap onto your mesh at a different angle or rotation. For example, you can make books stand up or be on their side when you drag them onto the node. This way you don't have to manually rotate or spin the product once you've dragged it onto your mesh.
Step 1) Make a basic cube. The cube can be any size but it is ideal to have it smaller than the area you're placing it on. For example, if your node is going to be placed on top of a shelf, make the cube smaller than the shelf.
Step 2) Select all the edges and faces of the cube. You can do this by simply drawing a selection around it or double clicking on one of the faces.
Step 3) Make sure all of the faces and edges of the cube are selected, then right click on it and choose "make component".

Step 4) In the name field, type "furniture.Floor.01". Make sure you capitalize Floor and include the periods. If you are making more than 1 node, you would name them like so: "furniture.Floor.01", "furniture.Floor.02", "furniture.Floor.03" and so on and so fourth.
Step 5) Click Create and move this newly created node to wherever you want the node on your mesh to be.
Step 6) Move the node halfway inside your mesh like this:

Note: If you're using the new version of Meshout, you can skip this step. In the new version, the bottom of the cube is the bottom of the node.
You do this because the middle of the cube is actually the bottom of the node, if you don't do this, your item will hover above your mesh when you drag it onto the node.
That's it, you're done. If you want to make more nodes to add to your mesh then simply repeat this process as many time as you like, but make sure to name the new nodes accordingly.
TIP: To save time, you can copy your existing node and paste it somewhere else to make a new node. Then just right click on the new node and choose "Entity Info" and edit the name. However, make sure you right click on the new node and choose "make unique" otherwise when you re-name it, it will rename your other node(s) too. This will allow you to easy and quickly make new nodes to add to your mesh.
TIP 2: You can rotate the node any way you like to make products snap onto your mesh at a different angle or rotation. For example, you can make books stand up or be on their side when you drag them onto the node. This way you don't have to manually rotate or spin the product once you've dragged it onto your mesh.


